
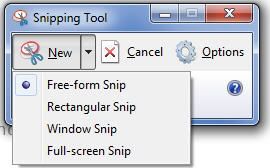
Drop down menu
We can see here there are four options. . Here is what they all do.
Free-Form Snip: Allows you to draw an area in any way you wish and a picture will be taken of that area and put in a small editor within Snippet Tool. You can then save it.
Rectangular Snip: This will only allow your pictures to be rectangle shaped. Once taken, the picture will be put in Snippet Tool and you can then save it.
Window Snip: Using this option will let you take a picture of a specific window of an application you have open. Once taken, it will put in Snippet Tool for you to save it.
Full-Screen Snip: Allows you to take a picture of your entire screen. The image is then placed in Snippet Tool so you can save it.Well, I hope this helps you understand how to take pictures on your Windows 7 computer. Next, we will discuss how to take pictures on Linux.
~Dave
No comments:
Post a Comment