I believe this is it, then to a long drawn out battle between my laptop and me. I didn't want to accept it at first, I didn't want to believe that the problem was the drive, but it was. Ever since I made the disk drive upgrade to my Macbook, I was having consistent freezing, disk i/o errors, as well as data underrun error being reported in the console. I would really like to thank Scott and Mike at iFixit for trying their best to help me. They sent me a new caddy, even a new drive adapter. And even though that did not fix the problem, the fact that they made the attempt to fix it really is amazing. They are the best customer service I have ever dealt with in a long time. I had never dealt/bought from iFixit prior to this, but that didn't matter. No matter what, they were determined to aid me with my issue.
So what was the problem in the end? The problem is that the Caviar Black 7200 RPM I bought was too fast. Simply put, when the data had to be converted from SATA to ATA, the disk would be moving to fast for the computer to handle. This would cause the data to "bottleneck" in the conversion area, thus slowing down my computer. How am I so sure this was the issue? To find out, I took an old 5400 RPM drive that I had, which is failing but still works, and popped it in the bay. I am writing to it, reading from it, and not seeing as many disk i/o errors in my console. There are still a few showing up in the console, but they are not enough to slow the computer down. Because of this, I now have to make another transaction. I will now have to go to Amazon and request an exchange for a slower Caviar Black drive, as well as pay the difference for the drive. This just goes to show that you can't rule out the most obvious option right away.
~Dave

Showing posts with label Customization. Show all posts
Showing posts with label Customization. Show all posts
Monday, September 12, 2011

Wednesday, August 24, 2011
It is picture clear!

~Dave
Sunday, August 7, 2011
Xcode and Moving Files
Yesterday I noticed that Xcode was not recognized as "Installed" on my Hackintosh due to the fact that I had moved it to another drive. So, as I should have done originally, I created a Symbolic Link. However, it still was showing up as "Installed" in the Mac App Store. Then I remembered that my version was outdated, so what I did was I re-downloaded the installer and ran it. I was overjoyed to see that the installer recognized the symbolic link, and immediately went and updated the files. I then deleted the installer and checked the Mac App Store. To my surprise, it was recognized as "Installed"! Hopefully I have no issues down the line, but as of now this is great since I didn't want to keep a 10 GB developer kit on my SSD.
~Dave
~Dave
Monday, July 25, 2011
Dell Has Impressed Me
A while back I mentioned the new laptop I helped my friend pick out. Earlier this week it arrived, and as of yesterday we opened it. The Dell XPS 17 that he ordered performed much better then I expected to be honest. Everything was pre-installed, including all those annoying dell drivers, After booting up, we made sure to remove the annoying Dell drivers, as well as Mcafee and Roxio Creator. Freed up quite a bit of space. We were a little disappointed with the fact that Steam was suppose to come pre-installed at no extra charge, but it would seem Dell forgot to do that. It only took us about half an hour to get the computer to where we wanted it to be. We installed the normals: Google Chrome, Pidgin, Skype, and Steam. Then, we updated the graphics drivers, and updated Windows itself. I usually use Microsoft Security Essentials, mostly because it is free and does a great job. My friend prefers to use Malware Bytes. I have never used this, but he says it is lighter (takes up less space) and does the same thing as MSE. In my opinion, what ever floats your boat.
His specs were good, coming in with an Intel Core i7 processor, Nvidia 555M 1GB graphics card, 6 GB RAM, a Samsung solid state drive, and a half terabyte Toshiba. His boot time was about 12-15 seconds, which is still really fast. I have to keep reminding him that he has to install more stuff to the hard drive and less to the SSD as the SSD will get slower the more it fills up, as well as die quicker. The computer only really got hot when we started gaming, but that was no big deal as the ventalation took care of most of the heat. Overall this is a great product, and I am quite surprised at how well it performs considering Dell's track record. I would recommend this computer to someone looking to an affordable gaming laptop.
~Dave
Sunday, July 24, 2011
Creating a Symbolic Link
This walkthrough was a little bit complicated for yesterday's SSD setup guide, so I made a separate post for this specifically. If you are running a computer with an SSD and an HDD, obviously you want to keep the larger files on the HDD. However, certain files and folders are needed by applications so that they can run properly. You can't just simply move those folders because then the application won't run properly. Certain apps such as Steam, iTunes, even iPhoto, all store information in your home directory. This is fine on an HDD, but on an SSD where you have minimal space this is not ok. So, how do we move these files? We have to create what is called a Symbolic Link. What this will do is make the OS "think" the files are in the right place, when really you are directing it to the HDD instead of the SSD. This does use terminal, so if you are not comfortable with using terminal I suggest you get comfortable soon, or deal with the space issue you have another way.
If everything went as planned, then you should have something that looks like this:
So go ahead, and give it a try. Best of luck to those you want to do this. Took me a couple of tries to get it right.
~Dave
1. Find the folder you would like to move. I am going to use my iTunes Music folder located in /User/*insert your username here*/Music/iTunes
2. Copy that folder that you have chosen anywhere you want on your HDD
3. When you are done copying, open up terminal. We want to delete the previous folder, so type:
cd /User/*insert your username here*/Music/iTunes
That will make sure terminal knows what folder we are in. Next type:
sudo rm -rf iTunes Music
It will ask you for your password, and then it will delete your iTunes Music folder from your SSD.
4.Now we have to create the Symbolic Link. Before moving forward, make sure terminal is still in the folder iTunes since that is where we are making the link. If you are doing this for something else, just make sure that you are in the folder that the original file (the one we just deleted) was in. Here is the difference between being in a folder and not being in a folder in terminal:
Notice one says desktop and the other doesn't. Now, while in the folder type the following into terminal to create the Symbolic Link:ln -s /Volumes/*Name of hard drive you moved the file to*/path/to/the/file
For me, I would type ln -s /Volumes/Applications/iTunes Music
All we are doing here is telling the computer to make a redirect folder pointing to where we moved the folder to.

If everything went as planned, then you should have something that looks like this:
 |
| Notice the folder with the arrow. That is a symbolic link |
~Dave
Saturday, July 23, 2011
Optimizing an SSD for Lion
TRIM
First and foremost, the one thing you must do after installing Lion is run Trim Enabler. What this does is enable the trim feature for your SSD if it is a non-Apple certified one (e.g if you bought something like an OCZ or a Corsair drive). Without trim enabled, you will wear down your SSD faster because the SSD will have to re-write information a lot more. What trim does is when you delete a file it is completely removed from the memory block. However, without trim, the SSD will think the file is not in the memory block, even though it still is. That means that when a new file has to be written, the no trim SSD will have to delete the old file and write the new one, where the trim SSD just has to write the new one.
HIBERNATION OFF
When OS X goes to sleep normally, it uses hibernation mode. This is ok on a HDD as you have a ton of space. However, on an SSD you don't have a ton of space and every byte counts. When hibernation mode is enabled, your computer will write all the contents of your RAM to your SSD. That means if you have a total of 8 GB or RAM, it will be written to your SSD. That is a lot of space to lose to RAM. We want to turn this off, so go ahead and open up Terminal.
HARD DRIVE SLEEP
By default OS X enables the command to put your hard drive to sleep when inactive. However, SSDs don't need to be put to sleep. Some even are known to freeze up when put to sleep. To disable this, simply go to System Preferences->Energy Saver and disable it. If you are on a laptop, make sure to disable it for both with and without the power adapter.
SUDDEN MOTION SENSOR
Another feature that is Hard Drive specific. This feature prepares a HDD for impact if it detects the computer falling suddenly. The features will disengage the hard drive head and stops the disks from spinning. With an SSD however, there are no moving parts, so this command is useless. To turn it off, type the following code into Terminal:
DISABLE SPOTLIGHT
If you don't search your computer a lot, then you have not reason to let spotlight index your computer. Simply turn it off by typing the following into Terminal:
I hope these tips help you out there who wanted to optimize your SSD for Mac.
~Dave
First and foremost, the one thing you must do after installing Lion is run Trim Enabler. What this does is enable the trim feature for your SSD if it is a non-Apple certified one (e.g if you bought something like an OCZ or a Corsair drive). Without trim enabled, you will wear down your SSD faster because the SSD will have to re-write information a lot more. What trim does is when you delete a file it is completely removed from the memory block. However, without trim, the SSD will think the file is not in the memory block, even though it still is. That means that when a new file has to be written, the no trim SSD will have to delete the old file and write the new one, where the trim SSD just has to write the new one.
HIBERNATION OFF
When OS X goes to sleep normally, it uses hibernation mode. This is ok on a HDD as you have a ton of space. However, on an SSD you don't have a ton of space and every byte counts. When hibernation mode is enabled, your computer will write all the contents of your RAM to your SSD. That means if you have a total of 8 GB or RAM, it will be written to your SSD. That is a lot of space to lose to RAM. We want to turn this off, so go ahead and open up Terminal.
Note: The $ sign is not required as part of the code.And that is it, you will now have no hibernation on your computer!
1. In Terminal type the following:
$ sudo pmset -a hibernatemode 0
This will then turn off hibernation.
2. Next we have to remove the old file (you may not have a file to remove if you just installed Lion and haven't put your computer to sleep yet). To remove the file type into Terminal the following:
$ sudo rm /var/vm/sleepimage
HARD DRIVE SLEEP
By default OS X enables the command to put your hard drive to sleep when inactive. However, SSDs don't need to be put to sleep. Some even are known to freeze up when put to sleep. To disable this, simply go to System Preferences->Energy Saver and disable it. If you are on a laptop, make sure to disable it for both with and without the power adapter.
SUDDEN MOTION SENSOR
Another feature that is Hard Drive specific. This feature prepares a HDD for impact if it detects the computer falling suddenly. The features will disengage the hard drive head and stops the disks from spinning. With an SSD however, there are no moving parts, so this command is useless. To turn it off, type the following code into Terminal:
sudo pmset -a sms 0
DISABLE SPOTLIGHT
If you don't search your computer a lot, then you have not reason to let spotlight index your computer. Simply turn it off by typing the following into Terminal:
sudo mdutil -a -i off
I hope these tips help you out there who wanted to optimize your SSD for Mac.
~Dave
Monday, May 23, 2011
Making the Switch
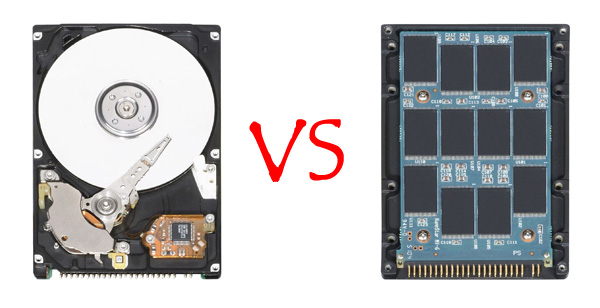
Wednesday, April 13, 2011
Forget Wall Chargers
 Ever needed to charge your iPod, but you have no more wall space left? Or maybe you don't want to leave it plugged into the computer all night. Well, there is a solution! FastMac TruePower U-Socket is that solution. It not only comes with two three-pronged outlets, but also comes with two USB adapters. This allows you to plug your USB device straight into the wall when charging. This would be a great addition next to a night stand if you charge nightly. The only two flaws I could see with this product are power outages and space. Unlike when charging on a computer, the wall is not protected by a surge protector, meaning this might fry your gadget. However, I would think there is some sort of safe guard built in, either in the gadget or the wall socket. The great thing about this product is it allows you to charge your USB device without having to use a wall charge; thus, saving space for another piece of technology. This nifty little device will run you about $23 and can be self installed. However, unless you're an electrician, I don't recommend installing it on your own. Last thing you want is to be shocked while installing this.
~Dave
Thursday, March 31, 2011
Aftermarket Cooler
Along with my new MSI 460 graphics card, I ordered a Zalman CNPS 9900 MAX. This is the first aftermarket cooler I had ever had to install, so I didn't realize what a task it would be. Before I started, I had to remove my entire motherboard from my computer. Always make sure that when you do this you are in a static free area, that you are grounded (no I don't mean by your parents), and that you have disconnected the power supply from the computer. The coller comes with different nuts and bolts which fit into it. It looked simple at first, but then I found that the directions were not so straight forward.
 When I went to install it, the first thing I had to do was attach two brackets on either side of the cooler so that I would be able to mount it. This proved probably to be the easiest part of the operation. All they needed to do was to snap into place. Next, I had to setup the mounting bracket. This was possible the most difficult part of the entire setup. The directions were not clear at all on how you are suppose to setup one of the pieces. I had to go online and watch a flash video from Zalman's website on how to setup this part of the cooler. It was only a little bit helpful. Confusion aside, I manage to get the bracket setup the correctly. Finally, all I had to do was apply the thermal paste. I decided to use Arctic Silver instead of what came with the cooler since I know Arctic Silver works very well. I used the "line method" when applying. By "line method" I mean I pulled the Arctic Silver in a straight line about 3/4" long. I may have made a mistake here because when I started to use the Arctic Silver, excess liquid came out first before the paste did. I don't think it did damage to my CPU, but I definitely know for next time to wipe a little onto a paper towel first to get it started. After applying the paste, I put the cooler on top and pressed down slightly so as to spread the paste. I followed that by aligning it with the bracket and attaching the screws.
After all that work, I put my motherboard back into the computer, reattached everything, and booted up. I had made sure to test my temperatures prior to removing the stock cooler, and those temperatures ranged between 39-42 degrees Celsius. After the new cooler was installed, the temperatures ranged between 28-32 degrees Celsius on idle. A significant drop. However, one of my Cores seems to still be at 39 constantly and I can't figure out why. Hopefully there is nothing wrong.
~Dave

After all that work, I put my motherboard back into the computer, reattached everything, and booted up. I had made sure to test my temperatures prior to removing the stock cooler, and those temperatures ranged between 39-42 degrees Celsius. After the new cooler was installed, the temperatures ranged between 28-32 degrees Celsius on idle. A significant drop. However, one of my Cores seems to still be at 39 constantly and I can't figure out why. Hopefully there is nothing wrong.
~Dave
Wednesday, March 30, 2011
MSI Hawk GTX 460 1GB GDDR5
 |
| My brand new graphics card! |
 |
| AMAZING! |
~Dave
Friday, January 28, 2011
Alfred

I am always open to trying new applications. When I found Alfred on the Mac Store, I was intrigued by what it did. Alfred is a free productivity application for Mac. It allows you to do a slew of things. For example, it allows you to search files on your computer. At first, some might say "Why not use spotlight?". Well, the simple answer is Spotlight search is slower then Alfred. In addition, Alfred can search Google, Amazon, and even Wikipedia. Alfred can define words, or help you spell a word by guessing what you are trying to spell. If you really like what Alfred does, then you can upgrade to the Powerpack. Powerpack is a $15 extension that add many features to Alfred. Some of these features in clude: An iTunes mini player, a Finder navigator, an Email searcher, and much more. You can try Alfred now for free on the Mac Store.
~Dave
Saturday, January 22, 2011
Sysinternal Suite

It was suggested to me by a reader that I have a look at Sysinternal Suite from Microsoft. The reader said that this is better then using Run and typing "msconfig". What Sysinternal comes with is a bunch of executable, that is .exe, files. Each file does something different to help you troubleshoot different parts of your computer. The file which the reader said to use is called "AutoRuns.exe". Once open, this file shows you all the process your computer uses when it starts up. If you hover your mouse over each, it gives you a short description of what each item does. This is a little more advanced then msconfig, and takes some research before using if you are not sure what you are doing. When you decide you don't need something on start-up, simply uncheck the box next to it. When you are done you can close the program, restart, and allow your computer to put the changes into effect. This shows a lot more then msconfig, so please do your research before using it. You could mess up your computer if you don't know what you are doing.
~Dave
Monday, December 27, 2010
When it Doesn't Work...Make it Work

At the moment I am writing this, there is a ton of snow outside. Yesterday we got quite a heck of a storm, so bad that when I went outside to work it was almost impossible to see. Knowing the storm was coming I spent some time in the morning trying to get my snow blower started. I kept trying the electric starter, however I burnt it out. How did I pull that off? By not reading the instructions. First lesson learned again and again, always read the instructions. So I gave it a break until the afternoon. There was quite a bit of snow and I had to get a move on it. So I went down and read the instructions on how to start in manually. It said to open the clutch, prime it, close the clutch, and start. My problem was that the primer button had dried out and had fallen off. So how do I prime it. It took me some thinking to figure this out. I needed something that could push air into the system. Then it came to me. I could use a bicycle pump! So I went and got on of my bike pumps and put the nozzle to where the primer button was. I opened the nozzle head so more air could get it, then pumped two or three times. I then gave it a couple of tugs on the starter and in seconds the machine came to life. I was so excited at this moment because I didn't think it would actually work. I though I would be stuck with a broken snow blower during this horrible storm. The second lesson I learned, never give up and always look for another way. There is almost always another way.
~Dave
Tuesday, December 7, 2010
Spaces for Windows
As an avid Mac user, it is hard to go without my spaces. Even Linux, both netbook and desktop edition, have spaces. For those of you who don't know, spaces, or workspaces, are different copies of your desktop where you can put applications. If you have four spaces, then you have four places to put applications. So why is it that Windows 7 does not? I may not know why, but I do know that I wanted spaces on Windows yesterday. After doing a little research, I found that you could do spaces on Windows. All I needed was an application. The application, known as Dexpot, allows Windows users to have spaces. The install is very easy, and the program itself is small. Plus, once installed, it is very easy to configure. Selecting the number of spaces, you can have up to 20, is as simple as typing a number. The keys that you press to activate it are very natural because they are almost the same as the ones on Linux. You can always change the keys if you want, I left mine the way it came. I also went to plugins and selected the "cube" effect. The cube effect, when activated, allows you to spin through your screens in a 3D cube. It is really just for show if anything, but I like it. You can also move applications from one space to another with ease. You can either drag it, or right click and click "Move to space X". X being the number of the space you wish to move it to. If you are like me and like to stay organized, I suggest you download this application. It is very useful!
~Dave
~Dave
Thursday, December 2, 2010
Easeus Todo Backup
Recently I picked up a new hard drive to replace my old Windows hard drive. The problem that confronted me immediately was how to get all my information from the old drive to the new one. I had settings on there I didn't want to change again, many games installed, and a few applications. I asked a friend of mine about it and he recommended I use Easeus Todo Backup. This application can back-up, restore, or clone hard drives. Cloning is exactly what I needed. I installed the program and ran the cloning option. I selected my current drive as the "Source Drive", the one where the information was being taken from. Then, I selected my new 1 TB Wester Digital drive as my "Target Drive", the one where the information was being sent to. I started at about 7:50 PM last night, but I am not quite sure when it finished because I went to sleep and left my computer running. To give you an idea, it was about 30% total completion by 10:30 PM. After copying my information, I booted into the new drive. My second problem was that my new drive was only formatted to read 149 GB in total, since that was the max size of the old drive. To fix this, I went into the Control Panel, and selected "Administrative Tools". Next, I selected "Computer Hardware" and in the new window selected "Storage" from the side bar. It then listed for me all of the hard drives in my computer. I found my 1TB drive, which showed 149 GB formatted and about 780 GB free space. I clicked on the section that was formatted for 149 GB and then right clicked. In the new menu that appeared I selected "Extend Partition". It asked how much I wished to extend, and I choose the maximum amount and clicked "OK". Now my drive is all setup. The only error I had after that was my GTA IV install asked me to use my product key again. I am in the midsts of dealing with that.
~Dave
Sunday, November 28, 2010
Speeding Up Windows 7: Keeping it Fast PT2
This article is continued from Speeding Up Windows 7: Keep it Fast PT1.
Disable Search Indexing
Unless you use the search bar frequently, there is no need for your computer to index everything. By turning off indexing you will gain a lot of speed because your computer is not busy else where. To turn off indexing, click "Start" and type in the search bar "services.msc" and find the one that says "Windows Search" Click on that.

Turn off unused features
Windows has a lot of background features that are unused, and in the end just slow down your computer. We want those off. To do this, open up the Control Panel and select "Programs and Features". On the side you will see "Turn Windows 7 Features On or Off", click on that.

Gadgets off
In Windows Vista a program called "Gadgets" was added, which is essentially like widgets for Mac. The problem with Gadgets is that they lie right on your desktop, and that slows your computer down if you don't use the. To turn Gadgets off, follow the steps in the above to get the the Windows Feature On Off winndow. Once there, turn off Windows Gadget Platform and click "Apply".

Drivers up to date
Last, but not least, is keeping all your drivers up to date. Newer drivers can actually add performance to your computer. Since I built my computer, I know exactly what motherboard I have, and what graphics card I have, so I know what to search for when getting drivers. If you don't know, you can always google your computer that you bought and find out. Check for new drivers at least once every month.
That concludes part II of this article, I hope it helped you, if you know more ways feel free to leave a comment about it!
~Dave
Disable Search Indexing
Unless you use the search bar frequently, there is no need for your computer to index everything. By turning off indexing you will gain a lot of speed because your computer is not busy else where. To turn off indexing, click "Start" and type in the search bar "services.msc" and find the one that says "Windows Search" Click on that.
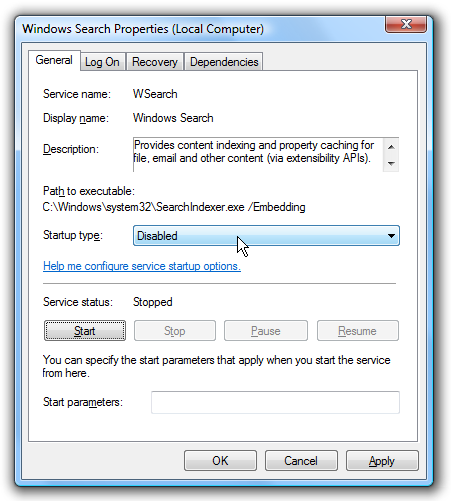
The window you will get when you open Windows Search service
As you can see in the window above, you disable it by clicking on the drop down menu and choosing disable, then click "Stop" under Service Status.
Turn off unused features
Windows has a lot of background features that are unused, and in the end just slow down your computer. We want those off. To do this, open up the Control Panel and select "Programs and Features". On the side you will see "Turn Windows 7 Features On or Off", click on that.

In the window that appears you will see a bunch of folders, each with different things in them. You can now start unchecking the ones you don't want. For example, I unchecked Tablet PC, some games, and indexing services. Once done, click apply.
Gadgets off
In Windows Vista a program called "Gadgets" was added, which is essentially like widgets for Mac. The problem with Gadgets is that they lie right on your desktop, and that slows your computer down if you don't use the. To turn Gadgets off, follow the steps in the above to get the the Windows Feature On Off winndow. Once there, turn off Windows Gadget Platform and click "Apply".

Drivers up to date
Last, but not least, is keeping all your drivers up to date. Newer drivers can actually add performance to your computer. Since I built my computer, I know exactly what motherboard I have, and what graphics card I have, so I know what to search for when getting drivers. If you don't know, you can always google your computer that you bought and find out. Check for new drivers at least once every month.
That concludes part II of this article, I hope it helped you, if you know more ways feel free to leave a comment about it!
~Dave
Saturday, November 27, 2010
Speeding Up Windows 7: Keep it Fast PT1
In the past I have mentioned tid-bits here and there about how to speed up your computer. I did some intense research over the past few days and found there are small things you can do within Windows 7 to increase performance and speed. Most of these things also work on Windows XP.
Defrag
First thing you want to do is to defrag your computer once every couple of months. This helps to keep your disk information all sorted and tied together, no lose ends. You can read more about this in my previous article.
Aero-Off
Windows 7 comes with the very beautiful Aero Theme, which at the same slows your computer down immensely. By turning this off, you will gain a significant speed boost. To do this, click on the "Start Menu" and then right click on "Computer"--->Properties. In the new window that appears click on "Advanced System Settings". You will get a new window that looks like this:


Defrag
First thing you want to do is to defrag your computer once every couple of months. This helps to keep your disk information all sorted and tied together, no lose ends. You can read more about this in my previous article.
Aero-Off
Windows 7 comes with the very beautiful Aero Theme, which at the same slows your computer down immensely. By turning this off, you will gain a significant speed boost. To do this, click on the "Start Menu" and then right click on "Computer"--->Properties. In the new window that appears click on "Advanced System Settings". You will get a new window that looks like this:

Continue by clicking on the "Advanced" Tab and then click on Settings under Performance. In the box that pops up you will see options related to the Aero Theme. Click on the one that says "Adjust for best performance". When applied, all of the Aero Theme will be turned off and your computer will look like it is on Windows 98. Before closing that window, one more thing you should do.Click on the "Advanced" tab and in the first box, the one that says "Allocate System Processes", choose Programs and click apply. By now you should be seeing a much needed speed boost.
Explorer.exe
The explorer.exe is what manages control over your taskbar and desktop. We want to make sure it is running at the best speed so we get the best performace. To get to it, open up the Task Manager and click on the "Processes tab. Seen below:

Locate the process "Explorer.exe" and right click on it. In the menu that drops down you will see a choice named "Set Priority". Click on that and choose "Realtime". This will make sure that your taskbar is the main focus of the processor. If it sets the priority to "High", that is ok.
Power Performance
If you are on a laptop. I don't recommend changing this setting as you will have to charge more often.
Open up the control panel and choose "Power Options". You will now have a window that looks like this:

Select "High Performance" from the available options. Now, when I did this it worked the only problem was I had trouble putting my computer to sleep. So, I went and edited the configuration (Change Plan-->Advanced Options) of "High Performance" and under Sleep I turned off "Allow Hybrid Sleep".
Upgrading your Drive and Ram
If you have the money to spend, upgrading your internal drive and your ram will make a huge difference in speed. Upgrade your HDD to an SSD, more information can be found here.. SSD are much faster and will make a huge difference. Also, upgrading your RAM is very important. In my opinion, 4GB of RAM is the standard today. If you don't have 4GB, I suggest you upgrade to that first. You can always have more, just make sure to check how much your motherboard can hold. Mine, for example, can't hold more then 16GB of RAM.
Start Up Apps and Services
I have mentioned this before, having applications start up will slow down your boot time greatly. What I am going to add is how to disable ones you may not know are there. Open up "Run". It is located in the Accessories folder in the start menu. Once open, type "msconfig", this stands for Microsoft Configuration. You will get a window that looks like this:

Looks a little scary, I know, don't worry
Select the "Start Up" tab. In this tab you will see all the applications that start up when you start your computer. Go through unchecking the ones that you don't want. For example, I didn't want iTunes or Quicktime to start up, so I uncheckedt them. The less you have on start up, the faster your computer will load. Also, if you don't know what it is either google it or don't change it. Next, head over to the "Services" tab.There are many items here, and although it seems overwhelming, there are some in there that we don't need.. Only turn off the ones you know! In my case, I turned off Fax, iPod Services, Remote Registry, Secondary Logon, Remote Desktop Configuration, Tablet PC Input Services, Parental Control, and Remote Desktop Services. I went and looked up some of these before I turned them off. Once you are done you can hit Apply, but don't close the window just yet, we will need it in our next step.
Boot Up
While still in msconfig, click on the Boot tab.There is a small section that says "Time out", it is most likely set to 30. Set that to 3, this will make your boot much faster as it times out quicker.
Keeping it Clean
Other then Defragging, mentioned above, we have temporary files that need to be dealt with. Open up "Run" again and type "cleanmgr.exe". An application will then open related to disk cleaning. It may ask you to select a drive, select the one with your OS on it, most likely the C: drive. It will then scan your computer for what needs to be emptied.

cleanmgr.exe window
Now, from here we want to select everything except "Setup Log Files" and the System/Per User Error Reports. Once done click "OK" and it will proceed to clean out these files. You will want to do this at-least once a month to keep you computer running fast.You can also use google as there are applications that can assist you with this, one example being CCleaner.
This will end part 1 of this article, part II will be out tomorrow. I didn't want to make it a huge wall of text, that is no fun. Check back tomorrow for part II!
~Dave
Wednesday, November 24, 2010
Custom USB Flash Drive - Bulk, Promotional, Wholesale, Branded USB Flash Drives
Custom USB Flash Drive - Bulk, Promotional, Wholesale, Branded USB Flash Drives. I recently discovered this website while surfing the web. I was really impressed with not only the selections of drives, but the ability to create your own USB flash drive. It is the perfect time to order a customized one too, because it is just in time for the holidays. From what I understand, you can create a design, and send it to them. They will then create a flash drive custom fit to your design. So, if you wish to spell out someone's name for their holiday gift, you can! I personally would like a 1x1 scale of a floppy drive which, when you slide the little metal piece on top, slides out the usb stick to connect to the computer. Just a little tid-bit before the holidays. I hope everyone has a happy Thanksgiving, there will be no update tomorrow.
~Dave
Tuesday, October 26, 2010
Windows: Login Script
Alright Windows fans, it is your turn. We will start off by removing anything that opens on start. Click on the Start menu, then look for the folder labelled "Startup". In there will be any programs that open on startup. You can delete them from there, as we are going to be making a start up script for the necessary ones. After deleting them, open up Notepad. For this example, we are going to use Google Chrome, Pidgin, and Steam. Once Notepad is open, type the following:
Take note that YOUR USERNAME should be replaced with the name you use to log onto your computer. Essentially what we are telling the computer is "Got into drive C, go through all of these folders, and open this application". The location where your application may vary depending on where you installed it. If you don't know where you installed the application, you can easily find it.
To find a application, simply open the start menu--->all programs--->right click on the folder--->Open--->right click on the shortcut--->open location. Now you will see where your application is installed by simply looking at the navigation bar. You can do the same thing with programs not in folders, you just skip straight to "right click and click open location".
Now that you have compiled all the programs in this notepad file, we need to save it. Click File--->Save As. A new window will appear. You will be asked to name the file and give an extension. However, we don't want the extension to be .txt, instead we want .bat because we are dealing with a batch file. Click the drop down menu and select "All File Types". Then name it what ever you wish, I am naming mine "Start Run", then add .bat at the end. So it will look something like this: Start Run.bat
Save it to an easily accessible location. I put mine on the desktop.
Finally, test the file by double clicking on it. If you followed the instruction correctly, you will have all the applications you put in open at once.
Please take not that I did this on a Windows 7 PC. Ways may vary slightly on Vista and XP PCs.
~Dave
start pidgin

cd C:\Users\YOUR USERNAME\AppData\Local\Google\Chrome\Application

start chrome

cd C:\Program Files (x86)\Steam

start steam
Take note that YOUR USERNAME should be replaced with the name you use to log onto your computer. Essentially what we are telling the computer is "Got into drive C, go through all of these folders, and open this application". The location where your application may vary depending on where you installed it. If you don't know where you installed the application, you can easily find it.
To find a application, simply open the start menu--->all programs--->right click on the folder--->Open--->right click on the shortcut--->open location. Now you will see where your application is installed by simply looking at the navigation bar. You can do the same thing with programs not in folders, you just skip straight to "right click and click open location".
Now that you have compiled all the programs in this notepad file, we need to save it. Click File--->Save As. A new window will appear. You will be asked to name the file and give an extension. However, we don't want the extension to be .txt, instead we want .bat because we are dealing with a batch file. Click the drop down menu and select "All File Types". Then name it what ever you wish, I am naming mine "Start Run", then add .bat at the end. So it will look something like this: Start Run.bat
Save it to an easily accessible location. I put mine on the desktop.
Finally, test the file by double clicking on it. If you followed the instruction correctly, you will have all the applications you put in open at once.
Please take not that I did this on a Windows 7 PC. Ways may vary slightly on Vista and XP PCs.
~Dave
Monday, October 25, 2010
Mac: Start Up
This will be the first of a two part section. I say two because I am not that familiar with Linux's start up. I can however learn if someone would like me to write an article on it. The Windows version of this post will be out tomorrow. Anyway, back to this. Those of you with Macs are like anyone else with a computer. You hate waiting for the computer to start up, yet you would like to have all your programs ready by the time your computer is ready. First, we want to remove any programs starting up unless you MUST have them on start up. To do this open System Preferences --->Accounts--->Your Account--->Login Items. Once here you can remove anything you like that is unneeded for start up. Next, open spotlight and search for Apple Script Editor. We are going to make a very simple script, nothing complicated. Let's say, for example, that you want Safari, iChat, and Mail to open when you run the script. To do this, type in Apple Script Editor the following:
Once you have done this, hit "Compile" (that is the one with the hammer). It will look for any errors in your script. If there are none, you can hit "Run" to test the script. If all went well, Safari, iChat, and Mail will open up. Now you are going to want this as a script that you can execute by clicking on it, not opening it up. Next, click "File"---> "Save As". Title it something like "Login Script", and then save it to an easily accessible place, such as your desktop. Now the next time you log in, all you have to do is run the script and everything you want to open will open!
~Dave
tell application "Safari"

   launch

end tell

tell application "iChat"

   launch

end tell

tell application "Mail"

   launch

end tell
Once you have done this, hit "Compile" (that is the one with the hammer). It will look for any errors in your script. If there are none, you can hit "Run" to test the script. If all went well, Safari, iChat, and Mail will open up. Now you are going to want this as a script that you can execute by clicking on it, not opening it up. Next, click "File"---> "Save As". Title it something like "Login Script", and then save it to an easily accessible place, such as your desktop. Now the next time you log in, all you have to do is run the script and everything you want to open will open!
~Dave
Subscribe to:
Posts (Atom)